My CNET colleague Katie Collins was putting together a superb feature around the repairability of wearable devices, in particular the Pixel Watch 4. It’s well worth a read, but my task was to produce the photos and video to accompany the story. From shooting close-up macro photos with specialist lenses to transforming my home into a studio to shoot the video, there was a lot for me to do.
I’m thrilled with the results, and the images look great on the page. Here’s how I put it all together.
Watch this: I Replaced the Screen on the Google Pixel Watch 4. More Wearables Should Be This Repairable
Macro photography: The camera equipment I used
While I love my Leica Q3 43 for out-and-about photography, my main camera for most of my studio product photography and macro work is my Canon R5. It’s high-resolution and has accurate autofocus and in-body stabilization, which can be a real boon.
My secret weapon for this shoot was the DZO Films X-Tract probe lens. This specialist macro photography lens looks weirdly long and thin, but it lets me get super close-up on objects while still providing a wide-angle view. The result is dramatic macro images, so I used this lens pretty much exclusively for the “hero” images in the piece. You can see more about how I used it in my behind-the-scenes video, which is embedded below.
But the right lens can only take you so far. I also used a Zhiyun Molus G300 LED light with a wide, narrow strip box modifier on the front. This turns that small LED light source into a wide light, which gives a great spread over the watch. I angled this to get a clean-looking edge light on some images, or a more even flood of light in others. I accented this using a variety of reflectors to “bounce” that light back into the product — in some cases, even small pieces of paper were enough to help create a nice reflection on the shiny watch.
Macro photography: Taking the images
I’d already decided on a visual style for these images, with a stark, high-contrast aesthetic, somewhat reminiscent of Apple’s OS X-era product photography. I wanted the images to be eye-catching and actually illustrative of what’s going on to ensure they fit well within the article itself.
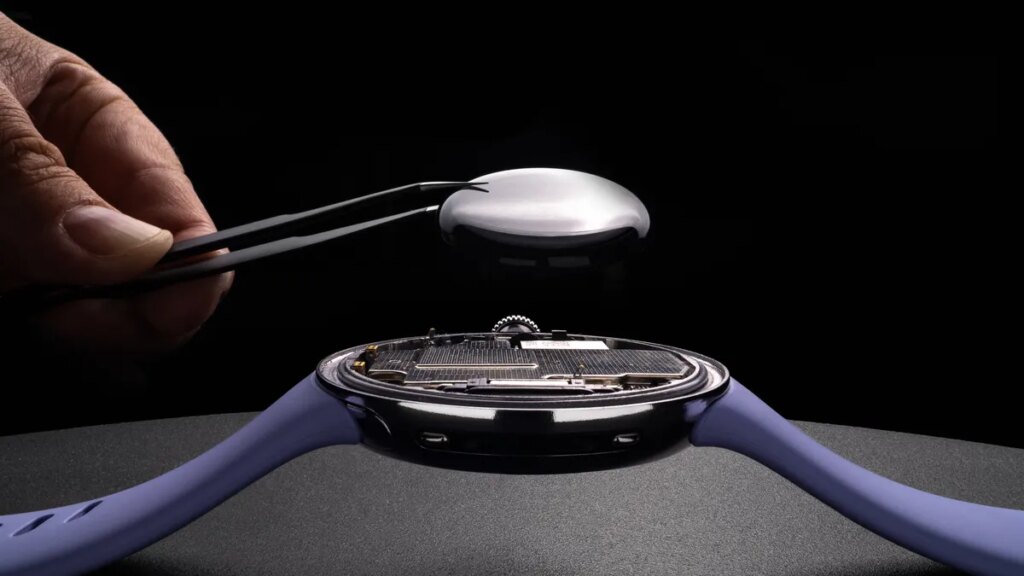
The probe lens let me get close up on the subject. As I didn’t have enough hands free, I’d secured the pincers in place using multiple rigging arms and a grip that’s supposed to be used for holding test tubes in laboratories. The finished shot is below.
To help achieve this, I used both static product imagery of the watch and my own hand coming into the frame using pincers to remove components like the battery or display. I mostly figure out a strong visual look for an image series in advance of a photoshoot. This can be one of the best ways to elevate your photos from simple snaps to something that stands out and tells a story. It takes a bit more time to think about, but the results will speak for themselves.
Once I had my scenes set up, I got the camera and the long probe lens into position and dialed in my settings: That’s usually around ISO 200 on my camera, an aperture between f16 and f32 on the lens and a shutter speed around 1/15 of a second. It’s quite slow, so I had to ensure the camera was locked down on a tripod to make sure there was no movement that would cause blur in the image. I used a remote shutter release cable so I didn’t have to touch the camera and risk moving it.
The finished image.
To ensure the whole product was perfectly sharp, I used a technique called focus stacking. This involved taking many images — usually around 20 — focusing first on the closest part of the watch and adjusting the focus with each image to move the focus point farther and farther away. I then stitched those images together using a dedicated piece of software called Helicon Focus.
Finally, I took the focus-stacked shot into Adobe Photoshop for some retouching, including dust removal, color correction and, in some shots, removing the big LED softbox from the image. I also composited some images together, blending a frame of the watch with a separate frame of my hand using the pincers. While I sometimes like to try and take these images as a single shot, I simply didn’t have that many hands available at once, so I had to blend multiple images together.
I used two pieces of white card as reflectors, bouncing some of the light from the overhead LED back into the shiny body of the watch.
Filming the feature video: More macro fun
Some of the clips in the video were shot much the same way as the still images above — I simply switched my camera to video mode and pressed record. But there was a lot more to do besides.
The main thing to film was Katie’s piece to camera, where she (expertly) presented her script. For this, I shot using a BlackMagic Pocket Cinema Camera 6K Pro paired with a 35mm Arles Prime cinema lens from DZO Film. I used a pink paper backdrop (because I love the color) and used the same LED light as before as the main light on Katie’s face, with a SmallRig RC 450B LED as a fill light on the other side of her face to help soften the shadows and give a more even look to the scene.
I recorded the audio using two microphones: a Rode VideoMic NTG shotgun mic on a boom arm just out of shot above Katie’s head (wirelessly connected using a DJI Mic 2 transmitter) and a separate DJI Mic 2 transmitter used with its own built-in mic clipped to Katie’s shirt collar and hidden by her hair.
To film Katie’s piece to camera I used a BlackMagic Cinema camera, two microphones and two large LED light sources.
Then came the Pixel Watch 4 teardown section, which I filmed using much the same setup. I repositioned the lights and switched the 35mm prime lens for a 75mm DZOFilm Arles Prime cine lens to allow me to get a much closer-up view on the intricate work Katie was doing, without having to get the camera (or lens) in the way of her work.
The video was then edited by expert CNET producer JD Christison, and finally, all of the pieces were ready to go.
My favorite image from the series. This was a combination of around 20 focus-stacked images for the main body of the watch, with separate images shot of my hand in different positions. I then composited these together in Photoshop.
If that sounds like a lot of effort, it’s because it was. My work on this took place over multiple late nights and an entire weekend. Product and macro photography can be a precise form of photography, requiring a lot of setup and a huge amount of attention to detail. When you’re focusing so close up, every tiny adjustment makes a massive difference in your image, so there’s a vast amount of trial and error.
And sure, it also requires a lot of equipment and a fair amount of space to set everything up. I’ve given over a large bedroom in my house to convert into a studio space for shooting photos and videos for CNET, so I don’t have to worry too much about making a mess. I installed specialist shelving and wall-mounted backdrop supports so I could use the admittedly compact space as a regular production studio. If you’re planning to recreate this sort of thing in your own home, be prepared for a lot of cleanup after each shoot.
But as this feature is a major piece for CNET, I wanted to ensure that the imagery we used looked as good as it can, so spending this amount of time and effort on these visuals is absolutely worth it. I’ve been a journalist at CNET for 15 years now, but it still gives me a great sense of pride to see my own images used in stories like this.

Khamrah by Lattafa for Men - 3.4 oz EDP Spray
4% Off
Ghost Sweetheart Eau de Toilette | Pineapple, Jasmine and Sandalwood | Perfume for Women 50 ml
50% Off
Marc Jacobs Dot Eau De Parfum for Women, 100 ml
42% Off
Ted Baker W Eau de Toilette for Her, Fig Leaf, White Peony and Violet Top Notes, Pink Orchid and Raspberry Middle Notes, 75ml
£11.77 (£15.69 / 100 ml) (as of 20/06/2026 03:33 GMT +01:00 - More infoProduct prices and availability are accurate as of the date/time indicated and are subject to change. Any price and availability information displayed on [relevant Amazon Site(s), as applicable] at the time of purchase will apply to the purchase of this product.)
Ted Baker Woman Pink Eau de Toilette Spray Floral Green Feminine Fragrance, Opening Notes are Fresh Peach, Bergamot and Tangerine with Warm Musk, Vanilla and Vetiver Base, 100ml
11% Off
Vera Wang Princess Eau de Toilette - 30 ml

Choco Musk 50ml Eau De Parfum for men and women | Chocolate Musk by Jannat Aromas
17% Off
Christina Aguilera Signature Eau de Parfum (50ml) Floral, Fruity & Exotic Scent, Luxury Fragrance for Women
9% Off
Calvin Klein - Eau De Toilette CKIN2U - Calvin Klein Women, Ladies Perfume, Women's Perfume, Calvin Klein Perfume, Calvin Klein One - 150 ml
5% Off
Jimmy Choo Flash Eau de Parfum, 60 ml (Pack of 1)
3% Off
Fruit of the Loom Men's Heavy T Shirt, White, XL UK
28% Off
ATNKE LED Lighted Beanie Cap,USB Rechargeable Running Hat Ultra Bright 4 LED Waterproof Light Winter Warm Gifts for Men and Women/Pink
17% Off
Men's 1/4 Zip Pullover UK Sale Clearance, Fleece Sweatshirt Casual Jumper Long Sleeve T-shirt Top Stand Collar Sweater Plain Pullover Sports Leisure Workwear Quarter Zip Sweater Lightweight Jumpers
£5.88 (as of 12/11/2025 00:52 GMT +01:00 - More infoProduct prices and availability are accurate as of the date/time indicated and are subject to change. Any price and availability information displayed on [relevant Amazon Site(s), as applicable] at the time of purchase will apply to the purchase of this product.)
Crevice Cleaning Brush, Bathroom Tile Groove Gap Cleaning Brush,Premium Crevice Cleaning Tool Aluminum Support with 15° Angle Magic Brush, Thin Brush for Home Kitchen
19% Off
Wireless Earbuds, Bluetooth 5.3 Headphones in Ear with HiFi Stereo Deep Bass, 4 ENC Noise Cancelling Mic Wireless Earphones 40H Playtime, Bluetooth Earbuds Dual LED Display, IP7 Waterproof, USB-C
42% Off